Wan 2.2 Animate Workflow: ComfyUI Guide (2026)
Build a Wan 2.2 Animate workflow in ComfyUI. Covers model files, preprocessing, animation vs replacement mode, VRAM planning, and troubleshooting.
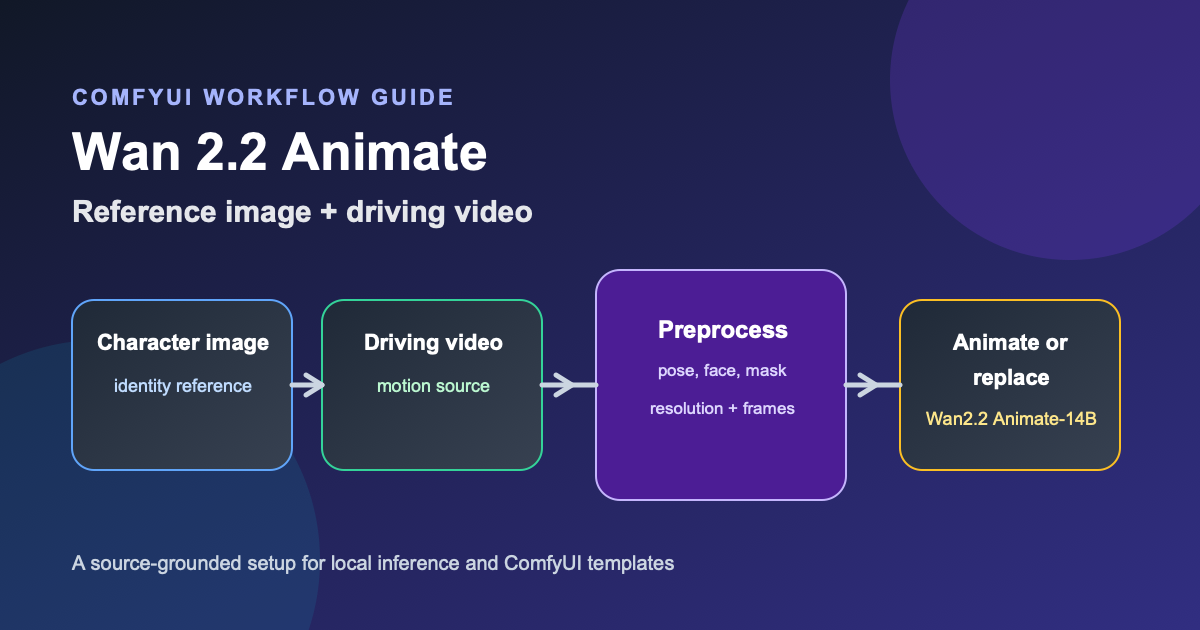
Wan2.2 Animate-14B is easiest to understand as a two-input workflow: a character image supplies the identity, and a driving video supplies the motion. You preprocess those inputs first, then run either animation mode or replacement mode. The extra preprocessing step is what separates this workflow from a simple image-to-video prompt.
This guide follows the commands documented by the Wan team and shows how to map the same stages to a ComfyUI workflow. It covers the model files, pose and mask preparation, ComfyUI settings, quality checks, and the failure modes that usually waste the most time. It focuses on Wan2.2 Animate-14B, not the newer Wan Animate 2 workflow documented separately by ComfyUI.
Key Takeaways
- Wan2.2 Animate-14B takes a character image and a driving video as its core inputs.
- Use
animationto create a standalone character performance; usereplacementto place the character into the source scene. - Preprocessing creates motion, face, background, and mask materials that the generation step consumes.
- Start with a clear single-person input, a short clip, and a moderate resolution before tuning masks or prompts.
What Is Wan2.2 Animate?
Wan2.2 Animate is the Wan team's unified framework for character animation and character replacement. The project page describes a pipeline that combines spatially aligned skeleton signals for body motion with implicit facial features for expression transfer. Replacement mode also adds a Relighting LoRA so the generated character can match the source scene's lighting and color tone (Wan-Animate project page, retrieved September 1, 2026).
The model is published as Wan2.2-Animate-14B. Its model card describes two modes: animation takes a character image and makes it follow the human motion in a video, while replacement swaps the visible character in the video for the supplied character image (Wan2.2 Animate-14B model card, retrieved September 1, 2026).
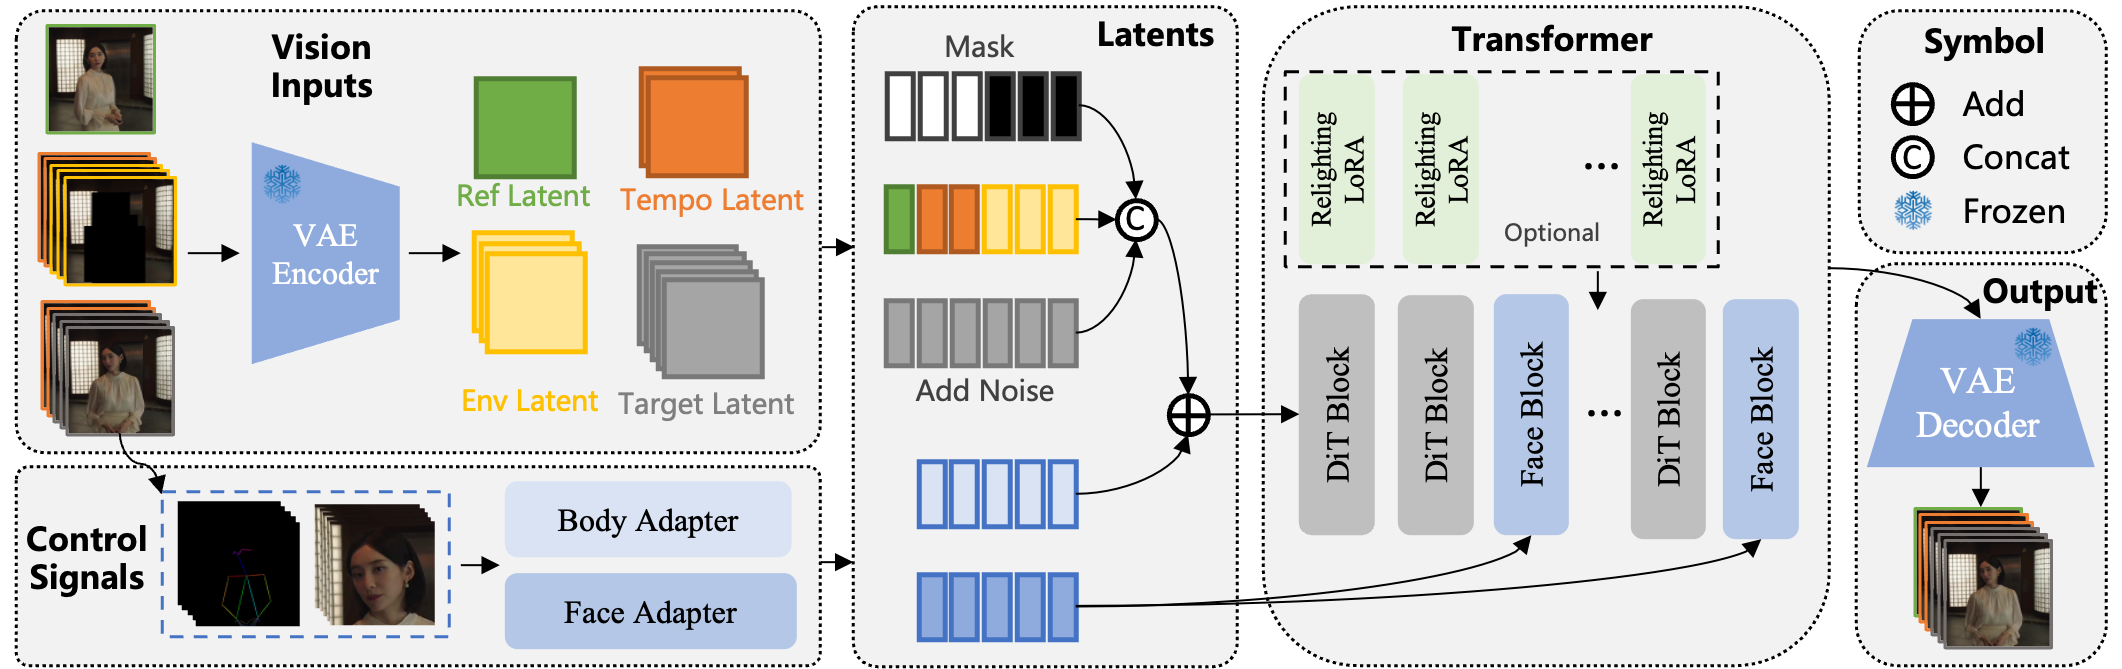
The Wan-Animate project diagram shows how reference appearance, motion signals, and scene information are combined. Source: Wan-Animate project page.
That distinction matters when you search for a Wan 2.2 Animate workflow. A standard Wan2.2 text-to-video or image-to-video graph does not automatically perform character replacement. If your goal is simply to add motion to one still image in a browser, our photo-to-video workflow follows a different, hosted path and does not claim to run Wan2.2 Animate.
Choose Animation or Replacement Mode First
Choose the mode before preparing files. The flags, intermediate videos, and quality checks are different, so combining them creates confusing errors later.
| Mode | What it produces | Extra preprocessing | Best first use |
|---|---|---|---|
animation | A new video of the reference character following the driving performance | Face and pose videos | A single character dance, gesture, or acting clip |
replacement | The reference character inserted into the driving scene | Face, pose, background, and mask videos | Replacing one person while keeping the original scene |
Animation mode is the safer starting point when you only need the motion. The Wan preprocessing guide recommends pose retargeting when the reference and driving characters have different body proportions. Its simplified retargeting pipeline is useful for testing, but the intermediate pose should always be checked before generation (preprocessing user guide).
Replacement mode needs more careful input selection. The built-in mask extraction is designed for single-person videos. A crowded scene can produce the wrong mask or incorrect pose tracking, and a large mismatch between the reference and driving body proportions can create visible deformation.
Rule of thumb: if you do not need the original background, begin with animation. Move to replacement only after the character and motion already work.
Prerequisites and Hardware Planning
You need a current ComfyUI installation, the Wan2.2 Animate-14B weights, and the preprocessing checkpoints. The Wan repository asks for PyTorch 2.4 or later and provides both Hugging Face and ModelScope download paths (Wan2.2 GitHub repository, retrieved September 1, 2026).
Before starting, prepare:
- A recent ComfyUI build. Update it if a workflow opens with missing core nodes.
- Python with PyTorch 2.4 or later for the official preprocessing and CLI path.
- The
Wan2.2-Animate-14Bmodel directory. - The pose detector
yolov10m.onnxand whole-body pose modelvitpose_h_wholebody.onnx. sam2_hiera_large.ptwhen you need the replacement mask pipeline.FLUX.1-Kontext-devonly when you choose enhanced pose retargeting.- One clear reference image and one short driving video.
There is no single useful minimum VRAM number for every Animate setup. Memory changes with resolution, frame count, precision, offload behavior, and the ComfyUI node implementation. For a first pass, the Comfy-Org character-replacement template recommends staying around 720p and testing roughly 77-150 frames. It also warns that 1080p may fail on some cards. Treat those numbers as a practical starting point, not a hardware guarantee (Comfy-Org workflow template, retrieved September 1, 2026).
For related input preparation ideas, see the image-to-video guide.
Step 1: Download the Model and Checkpoints
Download the exact Animate checkpoint before opening ComfyUI. Do not substitute the regular Wan2.2 T2V or I2V files: those models use different tasks and node graphs.
Using Hugging Face, the official repository documents this command:
pip install "huggingface_hub[cli]"
huggingface-cli download Wan-AI/Wan2.2-Animate-14B \
  --local-dir ./Wan2.2-Animate-14B
The preprocessing guide expects the supporting files under a checkpoint path similar to this:
Wan2.2-Animate-14B/
├── process_checkpoint/
│   ├── det/
│   │   └── yolov10m.onnx
│   ├── pose2d/
│   │   └── vitpose_h_wholebody.onnx
│   ├── sam2/
│   │   └── sam2_hiera_large.pt
│   └── FLUX.1-Kontext-dev/
└── model weights
The detector and pose model are mandatory for preprocessing. SAM2 is needed for the simplified replacement mask path. FLUX is optional and is used for enhanced pose retargeting in animation mode. Keep the model and process checkpoint paths separate in your notes so a missing preprocessing file is easy to identify.

The image is a character reference example included in the Comfy-Org template preview. Keep model weights and preprocessing assets in clearly named directories. Source: Comfy-Org workflow_templates.
Step 2: Preprocess the Inputs
Preprocessing turns the driving video into the materials that the Animate model expects. Run one branch only, then inspect the saved files before launching generation.
Animation preprocessing
The official example enables both basic retargeting and the optional FLUX refinement:
python ./wan/modules/animate/preprocess/preprocess_data.py \
  --ckpt_path ./Wan2.2-Animate-14B/process_checkpoint \
  --video_path ./examples/wan_animate/animate/video.mp4 \
  --refer_path ./examples/wan_animate/animate/image.jpeg \
  --save_path ./examples/wan_animate/animate/process_results \
  --resolution_area 1280 720 \
  --retarget_flag \
  --use_flux
This creates src_face.mp4 and src_pose.mp4 in the output directory. Open both files. If the face crop or skeleton is already wrong, the final render will not repair it.
Replacement preprocessing
Replacement adds background and mask materials. The official example exposes four parameters for mask shape and coverage:
python ./wan/modules/animate/preprocess/preprocess_data.py \
  --ckpt_path ./Wan2.2-Animate-14B/process_checkpoint \
  --video_path ./examples/wan_animate/replace/video.mp4 \
  --refer_path ./examples/wan_animate/replace/image.jpeg \
  --save_path ./examples/wan_animate/replace/process_results \
  --resolution_area 1280 720 \
  --iterations 3 \
  --k 7 \
  --w_len 1 \
  --h_len 1 \
  --replace_flag
In addition to src_face.mp4 and src_pose.mp4, this branch saves src_bg.mp4 and src_mask.mp4. A smaller, finer mask preserves more of the original background but can restrict the generated character. A larger, coarser mask gives the character more room but can change nearby background pixels. Adjust one value at a time, following the trade-offs in the Wan preprocessing guide.
For a deeper look at using a source clip as the motion input, use the video-to-video workflow.
Step 3: Load the Workflow in ComfyUI
The Wan repository documents the preprocessing and generation commands. For a visual ComfyUI graph, start with the template_purz_wan22_animate_auto_character_replace.json file in the Comfy-Org workflow_templates repository. The template is a Comfy-Org repository asset, not a Wan team project page, so verify its node requirements against your installed ComfyUI version.
The graph exposes the controls that matter most:
- Load the reference image into the
Reference Imagenode. - Load the driving clip into the
Input Videonode. - Set Width and Height. Keep the first test near 720p.
- Set FPS to match the intended output. The template uses 30 FPS as a typical value.
- Use
frame_load_capto limit the number of processed frames. - Enter a short motion prompt such as
the person is dancing. - Run the graph with the ComfyUI Run button or
Ctrl(cmd) + Enter.

This character reference example comes from the Comfy-Org template preview. The template keeps the first pass simple: resolution, frame cap, inputs, prompt, and export. Open the workflow JSON to inspect the current node graph.
The template center-crops the input video and reference image to the selected output dimensions. That is convenient for a square test, but it can remove important limbs or scene context. Check the crop before judging the model.
Step 4: Run the Model and Tune the Output
If you are using the official CLI path, run the command that matches the preprocessing branch.
Animation mode
python generate.py \
  --task animate-14B \
  --ckpt_dir ./Wan2.2-Animate-14B/ \
  --src_root_path ./examples/wan_animate/animate/process_results/ \
  --refert_num 1
Replacement mode
python generate.py \
  --task animate-14B \
  --ckpt_dir ./Wan2.2-Animate-14B/ \
  --src_root_path ./examples/wan_animate/replace/process_results/ \
  --refert_num 1 \
  --replace_flag \
  --use_relighting_lora
In ComfyUI, the equivalent idea is to pass the prepared input materials into the Animate node and then save the returned video. Use the prompt to describe the action or behavior, not to rewrite the character's identity. A concise prompt is easier to debug than a paragraph that changes pose, camera, lighting, outfit, and background at once.
Tune in this order:
- Replace the reference image if the face or body is unclear.
- Shorten the driving video or lower the frame cap if the run fails.
- Correct retargeting or mask inputs after checking the intermediate videos.
- Change one prompt phrase or one mask parameter per new render.
The Wan model card also warns against using LoRAs trained for regular Wan2.2 models with Wan2.2 Animate, because their weight changes can cause unexpected behavior (model card, retrieved September 1, 2026).
Watch out: a successful ComfyUI queue does not prove that the mask or pose is correct. Always inspect the intermediate files and the first few output frames.
If you want a hosted alternative for ordinary photo animation, the photo animation workbench is the relevant product path. It is separate from this local Wan2.2 workflow.
Troubleshooting Common Issues
Most failures fall into one of three groups: missing nodes, excessive workload, or incorrect preprocessing. Use the table below to isolate the group before changing prompts.
| Problem | What you see | First fix |
|---|---|---|
| Missing ComfyUI nodes | The imported graph shows red or unknown nodes | Update ComfyUI, restart it, and check the startup log for failed imports |
| Out-of-memory error | The queue stops during model loading or sampling | Lower Width and Height, reduce frame_load_cap, and test a shorter clip |
| Pose drift | Arms, legs, or proportions change between frames | Check src_pose.mp4; use retargeting when body proportions differ |
| Face instability | The face changes identity or expression looks broken | Use a sharper reference image and inspect src_face.mp4 before rerunning |
| Mask leakage | Parts of the original person remain visible | Adjust iterations, k, w_len, or h_len one at a time |
| Background damage | The replacement affects nearby scene pixels | Reduce mask coverage or use a cleaner single-person source video |
| Multi-person failure | The wrong subject is masked or tracked | Start with a single-person clip; the simplified mask flow is not designed for crowds |
| Lighting mismatch | The inserted character looks cut out | Run replacement with --use_relighting_lora and check the source lighting |
| Unstable LoRA result | The output has unexpected style or motion changes | Remove regular Wan2.2 LoRAs and test the base Animate checkpoint |
The preprocessing guide notes that lowering FPS can improve efficiency but may make motion look choppy. Keep the source frame rate stable while diagnosing identity or pose problems, then test a lower FPS only when runtime is the bottleneck.
For related source-video fixes, use the video-to-video troubleshooting guide.
Quality Checklist Before Export
Use this short preflight before exporting a longer clip:
- The reference image shows one clear character with visible facial features.
- The driving video has one identifiable subject and continuous motion.
- The crop preserves the face, hands, and feet needed for the action.
src_face.mp4andsrc_pose.mp4play correctly.- Replacement runs also have valid
src_bg.mp4andsrc_mask.mp4files. - Width, Height, and frame count fit your available memory.
- Animation and replacement flags match the preprocessing branch.
- Relighting is enabled only for replacement mode.
- The first output is reviewed frame by frame before batch rendering.
- The Wan2.2 Apache 2.0 license text is retained when redistributing model files.
These checks protect more than render time. A clean intermediate result gives you a useful baseline for deciding whether a problem comes from the input, preprocessing, or the generation node.
Frequently Asked Questions
What inputs does Wan2.2 Animate need?
Wan2.2 Animate needs a character reference image and a driving video. The image provides the character appearance, while the video supplies body motion and facial performance. The preprocessing stage converts them into the materials consumed by the generation step.
What is the difference between animation and replacement mode?
Animation creates a new video of the reference character following the driving performance. Replacement inserts that character into the driving scene and therefore needs background and mask materials in addition to face and pose materials.
Does Wan2.2 Animate work in ComfyUI?
Yes, ComfyUI users can use compatible workflow templates and nodes, including the character-replacement template in the Comfy-Org workflow_templates repository. The Wan team's official documentation still provides the clearest reference for preprocessing flags and CLI generation, so check both sources when a node or model name changes.
How much VRAM does Wan2.2 Animate require?
There is no universal minimum that applies to every implementation. Resolution, frame count, precision, model loading strategy, and custom nodes all affect memory. Start near 720p with a short clip, then increase one setting at a time.
Can I use regular Wan2.2 LoRAs with Wan2.2 Animate?
The official model card does not recommend it. LoRAs trained for regular Wan2.2 checkpoints can change weights in ways that are not compatible with the Animate workflow and may produce unexpected results.
For a different image-driven workflow, see the image-to-video workflow guide.
Conclusion
A reliable Wan 2.2 Animate workflow is a sequence, not a single prompt: choose the mode, prepare the reference image and driving video, download the right checkpoint, preprocess the inputs, load the ComfyUI graph, and inspect the intermediate files before a longer render. Animation mode is the better first test. Replacement mode is more capable when you need the original scene, but it adds mask and lighting decisions that must be checked.
Start with a short single-person clip, moderate resolution, and one change per iteration. Once the pose, face, and crop are stable, you can raise frame count or refine the mask. If you only need a simpler hosted photo animation flow, continue with our photo-to-video workbench.
Author

Categories
More Posts

How to Make Your Ancestors Smile Using AI (Step-by-Step)
A practical guide to animate old photos into natural, shareable videos—without uncanny artifacts.
How to Animate a Picture
Learn how to animate a picture in Canva, Adobe Express, or an AI photo animator. Compare methods, then turn a still image into a short video.
Top 7 AI Image-to-Video Tools You Must Try in 2026
A practical shortlist of image-to-video generators—what each is best for, what to watch out for, and how to pick fast.
Newsletter
Join the community
Subscribe to our newsletter for the latest news and updates